
I love Halloween! It’s been a while since I don’t share our Halloween over here so I wanted to show you some photos.
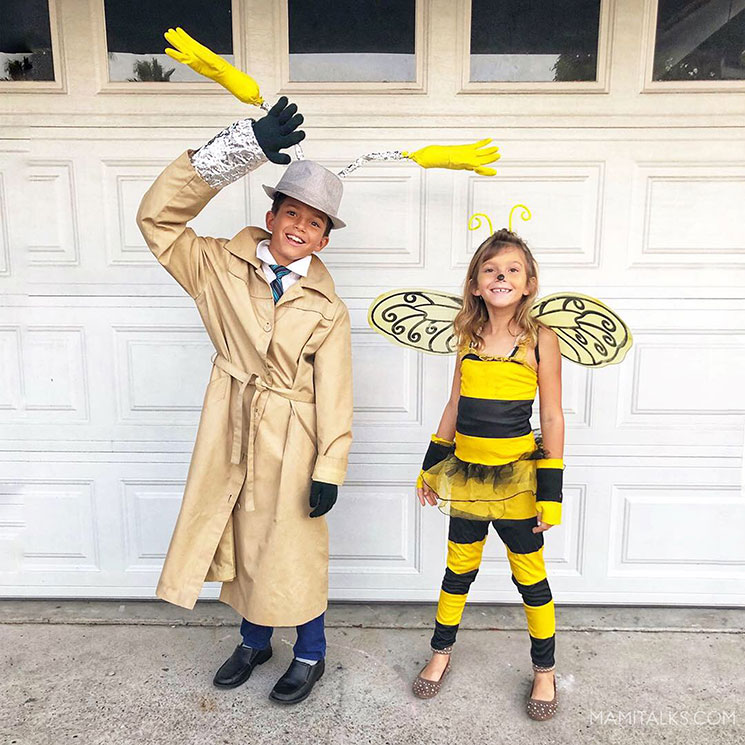
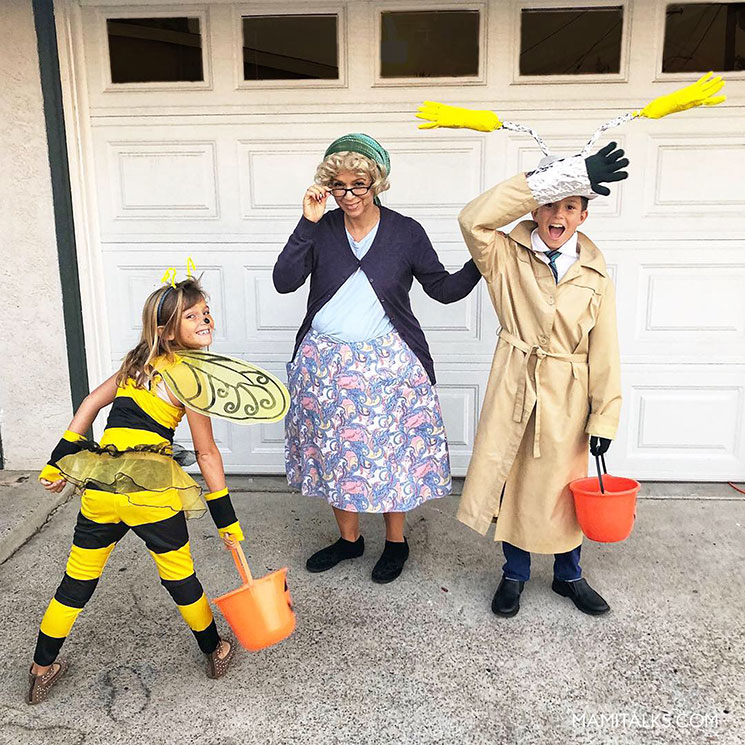
This year Adrian wanted to wear an Inspector Gadget costume– I used to watch that cartoon! The kids now watch a revamped Inspector Gadget in Netflix so they are into it (well, they already watched the whole thing).
I searched around the web and found some cool DIY costumes, we took some ideas and made our own, I felt like sharing with you in case one day you are in need to make your own Inspector Gadget!
I found the most helpful instructions from Persia Lou on how to make the hat which I think it’s the most important part and Adrian also made a robotic arm following a YouTube video. We did some modifications of our own so below are the instructions of what we did.
INSPECTOR GADGET COSTUME DIY
Supplies:
- Gray Fedora Hat
- Headband (it worked best with a metal cat ears headband)
- Small zip ties
- Wide Straws
- A wire from a hanger
- Yellow kitchen gloves
- Polyester fiberfill
- Rubber bands
- Poster board
- Aluminum foil
- Popsicle sticks
- Wooden skewer
How to make it:
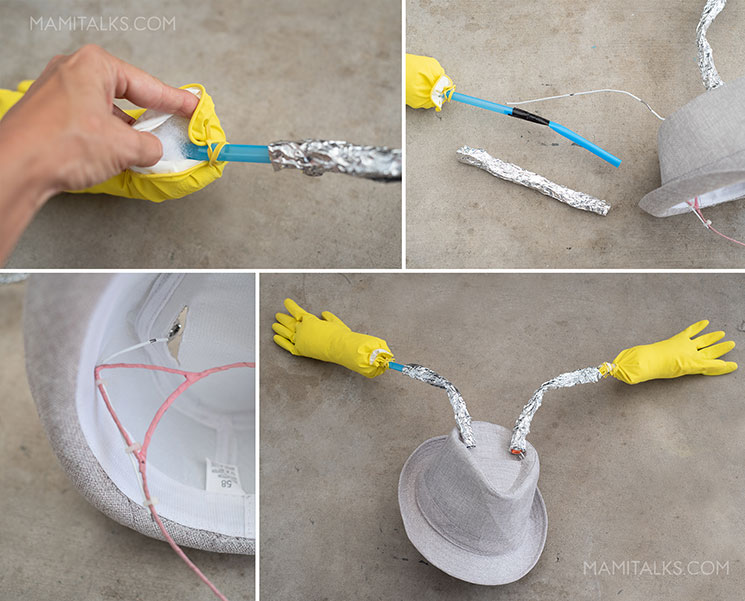
- Fill the gloves with the fiberfill, insert the straws, attach 2 straws together if necessary, tie the end of the glove with a rubber band.
- Cut the wire hanger to make 2 wires, attach to the headband either by rolling or with zip ties. If you use the cat ears headband it will be super easy just with zip ties.
- Make 2 slits on the top of the hat and insert the 2 wires already attached to the headband, then attach each straw (already with the gloves. After they are attached, wrap the straws with aluminum foil.
- The hat: I love to shop around the thrift stores for costumes (well, for everything actually!) so we looked for a gray hat and didn’t find it until the very last day!! I had already got one at Amazon though but it proves that anything is possible with the Thrift stores, just start early.
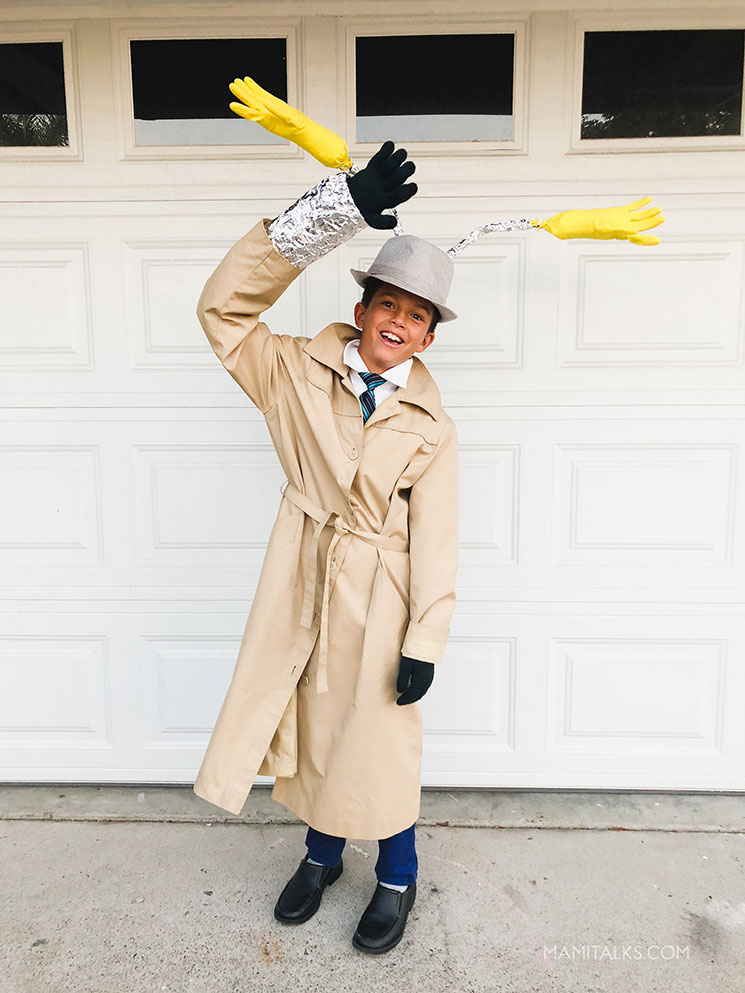
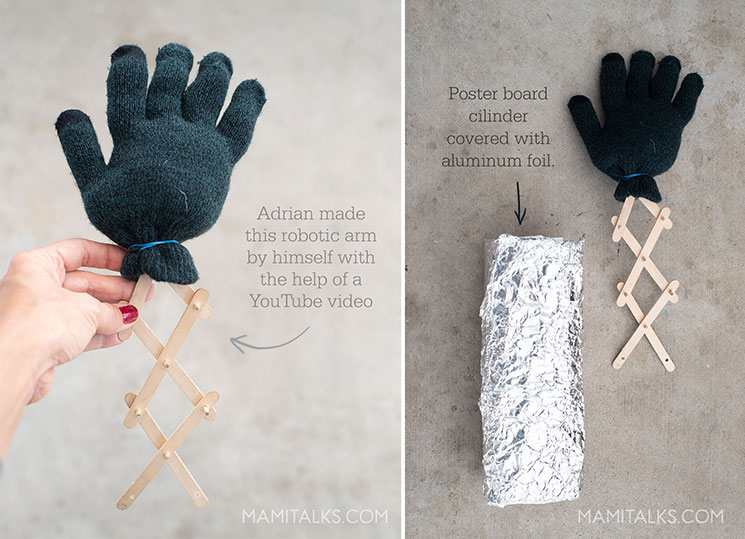
- To make the extendable arm Adrian followed this video, we helped him cut the holes and the wooden skewer, he filled a regular dark glove and attached it to the extendable arm with a rubber band. Then we cut a poster board, wrapped it as a cylinder using tape and covered it with aluminum, that went around the extendable arm and inside the trench coat’s sleeve.
- The trench coat is mine, even though we looked for one in the thrift stores, it would be hard to find a small one that could fit the boy.
I think it turned out great even though we didn’t make more details like the hand holding an ID for example, which would be pretty easy too. Adrian was so happy with it he said he might wear it next year too!
LITTLE BEE
Maya’s costume was so cute! I found it at Goodwill for $5, it had the glovettes missing so I made her a pair with felt, that made me feel good to be able to sew her those! It also didn’t come with a headband so she made one herself! Isn’t it cute? She just attached 2 pipe cleaners to a black headband and curled them at the end. We loved her costume because it’s so her plus Derek calls her Little Bee all the time and did you ever watch Maya the Bee??!!!
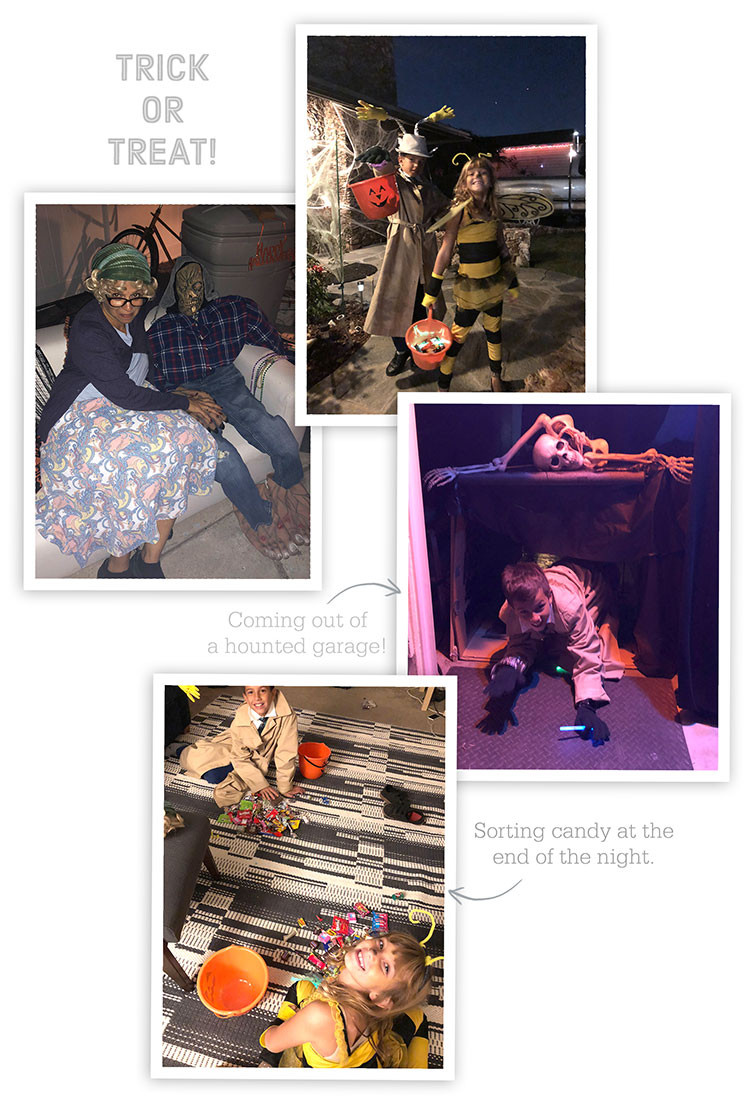
Trick-or-treating was so new this year, we just walked right out without having to drive, how exciting! Plus there were several haunted houses around. We didn’t plan it right however because nobody stayed at home giving away candy and when we came back nobody stopped by to get candy, we ended up with the whole container of candy. Next year we’ll plan better.
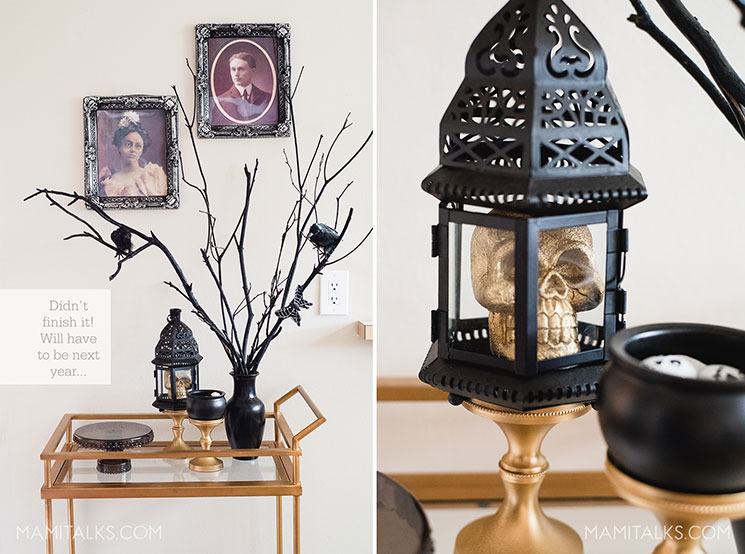
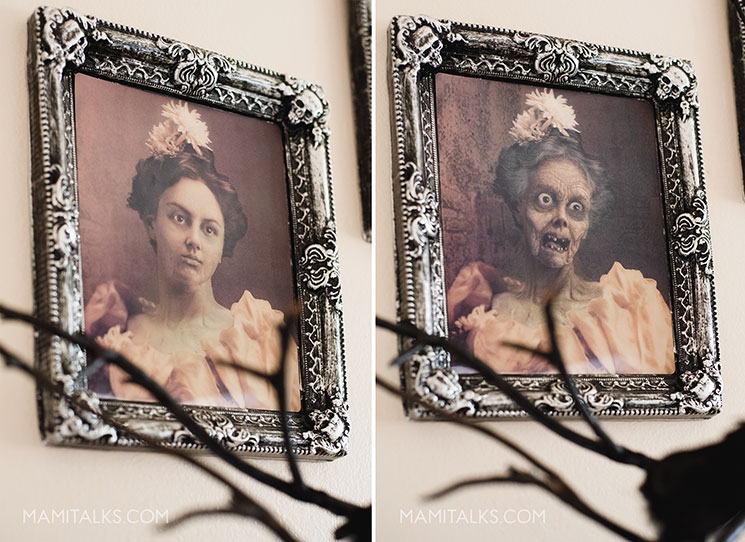
MY HALLOWEEN DECORATION
Since we moved and have a different space to decorate inside, I felt like decorating for Halloween and did a special corner for it, which I didn’t quite finish but I wanted to show you what I did. I plan to put it up next year as well and hopefully finish it so I might make a little tutorial of how I made it, it was fun to do and the family liked it! We also had outside to decorate! That is a lot for me that I wasn’t used to do anything before because we were in an apartment. I put out some pumpkins and lots of spider webs with a huge spider! We didn’t carve pumpkins this year, boo!!
-ESPAÑOL-
NUESTRO HALLOWEEN: CÓMO HACER UN DISFRAZ
DE INSPECTOR GADGET Y ABEJITA
A mi me encanta el Halloween, hace tanto tiempo que no les comparto aquí de nuestro Halloween que esta vez quise haerlo.
Este año, Adrian quiso el disfraz de Inspector Gadget. ¡Yo veía esta comiquita! Los niños ahora ven un Inspector Gadget renovado en Netflix, y entonces por eso Adri lo quiso.
Busqué en la internet ideas y encontré algunas instrucciones de disfraces, agarré algunas ideas e hicimos la nuestra. Lo quise compartir con ustedes en caso de que algún día necesiten hacer su propio Inspector Gadget.
Las instrucciones que me parecieron más chéveres fueron las de Persia Lou y ella enseña cómo hacer el sombrero, que creo que es la parte más importante. Adrian también hizo un brazo robótico con un video de YouTube. Hicimos algunas modificaciones propias, así que aquí abajo están las instrucciones de lo que hicimos.
COMO HACER UN DISFRAZ DE INSPECTOR GADGET
Materiales:
- Sombrero tipo Fedora gris
- Cintillo (funcionó mejor con orejas de gato de metal)
- Tirantes p Pajas anchas
- Un alambre de un gancho de ropa
- Guantes de cocina amarillos
- Relleno de fibra de poliéster
- Ligas
- Cartulina
- Papel de aluminio
- Palitos de helados
- Palito de pinchos de madera
Instrucciones:
- Rellene los guantes con el relleno de fibra, inserte las pajitas, junte 2 pajitas si es necesario, ate el extremo del guante con una banda de goma.
- Corte el colgador de alambre para hacer 2 alambres, adhiera a la diadema enrollando o con bridas. Si usas la diadema de orejas de gato, será muy fácil solo con bridas.
- Haga 2 ranuras en la parte superior del sombrero e inserte los 2 cables que ya están unidos a la banda para la cabeza, luego fije cada pajita (ya con los guantes. Una vez que estén unidos, envuelva las pajitas con papel de aluminio.
- El sombrero: me encanta comprar disfraces en las tiendas de segunda mano (bueno, ¡para todo me gusta ir!) Así que buscamos un sombrero gris y no lo encontramos hasta el último día! Sin embargo, ya había comprado uno en Amazon, pero prueba que todo es posible con las tiendas de cosas usadas, solo hay que empezar con bastante anticipación.
- Para hacer que el brazo extendible Adrian siguió este video, lo ayudamos a abrir los huequitos y a cortar el pincho de madera, llenó un guante oscuro normal y lo amarró al brazo extendible con una liga. Luego, cortamos una cartulina, la envolvimos como un cilindro y la cubrimos con papel aluminio, el cubrió el brazo extendible con eso lo metió dentro de la manga de la gabardina.
- La gabardina es mía, aunque buscamos una en las tiendas de segunda mano, fue difícil encontrar una tamaño pequeña para niños. Creo que resultó muy chévere, aunque no hicimos más detalles como la mano de arriba podría agarrar un carnet, lo que también sería bastante fácil. Adrian estaba tan feliz con eso que hasta dijo que también podría usarlo el año que viene.
LA ABEJITA MAYA
El disfraz de Maya quedó muy cuchi. Lo encontré en el Goodwill por $5, le faltaban las muñequeras, así que le cocí un par con fieltro, ¡me sentí super bien que le pude hacer algo jeje! Tampoco trajo el cintillo con antenitas así que ella misma se hizo uno ¿Que tal? Ella solo amarró 2 limpiadores de pipa a un cintillo negro y los dobló al final. ¡Nos encantó su disfraz porque es tan ella! Derek la llama Little Bee todo el tiempo y además, nunca vieron la abeja Maya??!!
Trick or treat fue una experiencia nueva este año para nosotros, porque sólo salimos sin tener que montarnos en el carro a ir a otro lugar, ¡qué chévere! Además, había varias casas embrujadas alrededor, aunque no lo planeamos bien porque nadie se quedó en casa regalando caramelos y cuando regresamos, nadie nos tocó la puerta para hacer trick or treat, terminamos con el bowl de caramelos enterito. El año que viene planearemos mejor.
MI DECORACION DE HALLOWEEN
Como nos mudamos y tenemos un espacio diferente para decorar adentro, me provocó decorar de Halloween entonces hice un rincón especial, que no terminé, pero quería mostrarles lo que hice. Estoy planeando ponerlo el próximo año y espero terminarlo para poder hacer un pequeño tutorial de cómo lo hice, ¡fue divertido hacerlo y a la familia le gustó!
También tuve espacio de decorar afuera, es bastante para mí ya que no estaba acostumbrada a hacer nada antes porque estábamos en un apartamento. Puse unas calabazas en la entrada y un montón de telarañas con una araña enorme. No cortamos calabazas este año, que triste.
No Comments