

Decorating the kid’s room has been fun, I have not told you much details here but we started early this year when we bought a bunk bed for them, we moved some furniture around and got rid of Adrian’s bed (that one we DIY here ourselves years ago!!) and Maya’s crib which was working as toddler bed without one of side railings.
We haven’t finished yet because to do everything we’ve been saving money and doing everything slowly but little by little it’s almost done! Now we just need small details like lamps, toy organization boxes and little things like that.
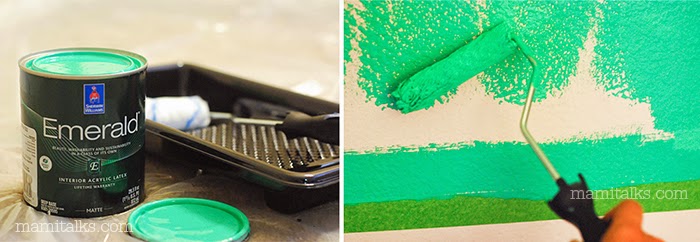
Painting this wall was something that occurred to me all of a sudden and I think adds a very cool touch to the whole room. This is my second post with Sherwin Williams, check out the first one here.

The apartment walls are beige all around and I really haven’t painted them differently or anything that but in the kid’s room there is always so many pretty and fun things that can be done so I decided to go for it.
Their room is small and although there is a large window, it’s not so bright so I did not want to paint a large wall with a strong color, plus we have a small wall painted as black chalkboard (I’ll be posting about that one soon too!) which darkens it a little more.
This made it easier to decide to paint only one wall of the room and in stripes, and it gives it a really cool and original style.
Oh and also we took the opportunity to remove a piece of furniture that was not helping us organize at all, just check the disaster pictures of the “before”where the toys where. So the kids helped pull all the toys and separate them into 2 bins: Keep and Sell. I sold the piece of furniture on craigslist and now the toys are organized differently across the room, I’ll show you that later too.

Choosing the color
Since Maya and Adrian share the room the color couldn’t be too girly or too boyish.
At first I thought of just using a white tone and just leave the stripes white and beige to not make it so complicated but then I thought I should take advantage and add a bright color, green would be perfect because it’s more neutral.
I decided on an emerald green, I first chose several greens online looking at the colors of Sherwin Williams and then I went to the store to get samples and see them live here in the room, that’s how I decided on the color Julep, it’s a bold color but not so strong.
Process of painting stripes on the wall
The process of painting the stripes was much easier than I imagined! You just need a measuring tape, a pencil, a rope and of course, masking tape.
Here are the steps:
1. If you’re going to paint the background of another color, paint the entire wall first and let it dry thoroughly before painting the stripes. In this case I left the beige background but I recommend painting the background in case there are any mistakes you have the paint to corrects them.

2. Measure the height of the wall and divide the distance depending on how many stripes you want. There always has to be precise, if you make 5 lines and 4 of them are 10 inches and is 11, is not much notice.
3. Mark with a pencil on both sides of the wall for each stripe.
4. Stick the string with tape on one side of the wall and then take it to the other side so that it is very tight, stick the tip to the other side too.
5. Now use the masking tape and place it above the cord (without going directly “on” the cord) from side to side of the wall.

6. Repeat step 4 and 5 for all other stripes, note that in some stripes, the tape should be placed below the cord to make room for painting.
7. After applying the masking tape on all the wall place small pieces of tape on the areas where there WON’T be paint so that there is no confusion.
8. Paint the stripes, you’ll need at least 2 coats of paint.

9. Do not let dry the paint for too long before removing the tape because the lines might get damaged a bit when removing. If this happens, apply paint with a small brush and go!

Tip: When painting stripes do not put too much paint along the edges so that later when pulling the masking tape it comes out easily.

Cómo pintar una pared a rayas
El proyecto de decorar el cuarto de los niños ha sido divertido, no les he contado mucho pero empezamos a principio de año cuando compramos una litera para los niños, movimos algunos muebles y además sacamos la camita de Adrian (esta que hicimos aquí nosotros mismos hace años!!) y la cuna de Maya que ya estaba como camita sin la baranda de un lado.
Todavía no hemos terminado porque para poder hacer todo hemos tenido que ahorrar suficiente dinero y hacerlo todo poco a poco pero ya casi casi terminamos, solo faltan detalles como lámparas, cajas para guardar juguetes y cosas pequeñas, que emoción!
Pintar esta pared fué algo que se me ocurrió de repente y le añadió un toque muy chévere a todo. Este post se los traigo gracias a mi asociación con Sherwin Williams, pueden ver mi primer post aquí!

Las paredes de todo el apartamento son de color beige y la verdad no he querido pintarlas diferente ni nada por el estilo pero en el cuarto de los niños se pueden hacer cosas tan bonitas y divertidas que decidí meterme con la pintura.
El cuarto es pequeño y a pesar de que hay una ventana grande, no es tan luminoso por lo cual no quise pintar una pared grande de un color fuerte, además ya tenemos una pared pequeña pintada de negro estilo pizarrón (pronto les traigo un post completico acerca de eso!) lo cual oscurece un poquito más.
Esto hizo más fácil decidir pintar una pared del cuarto solamente y a rayas, lo cual le da un estilo bien chévere y original.
Ah y además aproveché de eliminar un mueble que no nos estaba ayudando a organizar, nada más vean las fotos de “antes” del desastre que se hacían los juguetes ahí. Entonces antes de empezar los niños ayudaron a sacar todos los juguetes y separarlos: los que se quedan y los que se van. El mueble lo vendí en craigslist y los juguetes ahora están organizados de otra manera en otro lado que después les enseñaré!

Escogiendo el color
El color no podía ser ni muy masculino ni muy femenino ya que lo comparten Maya y Adrian.
Al principio pensé en solo usar un tono de blanco y dejarlo beige y blanco para no ser muy complicado pero después me pareció que había que aprovechar y añadir un color vivo, el verde le quedaría perfecto ya que es más neutral.
Me decidí por un verde esmeralda, primero escogí varios verdes online viendo la gama de la familia de colores de Sherwin Williams y después me fuí a la tienda a buscar las muestras y verlas en vivo aquí en el cuarto, fue así como me decidí por el Julep, es un tono vivo pero no tan fuerte.
Proceso de pintar rayas en la pared
¡El procedimiento de pintar las las rayas fué mucho más fácil de lo que me imaginé! Solo hace falta una cinta de medir, un lápiz, una cuerda y por supuesto cinta de pintor.
Estos son los pasos:
1. Si vas a pintar el fondo de otro color, pinta toda la pared primero y déjala secar bien antes de pintar las rayas. En este caso yo dejé el beige de fondo pero recomiendo pintar el fondo para así cualquier error tener el color para corregir.
2. Mide la altura de la pared y divide la distancia dependiendo de la cantidad de rayas que quieras pintar. No siempre tiene que ser preciso, si haces 5 rayas y 4 de ellas miden 10 pulgadas y una mide 11, no se notará mucho.
3. Marca con un lápiz de ambos lados de la pared cada raya.
4. Pega el cordón de un lado de la pared y llévalo al otro lado de manera que quede bien tenso, pega en la punta del otro lado también.
5. Ahora usa la cinta de pintor y pégala encima del cordón (sin pisar el cordón) de un lado al otro de la pared.
6. Repite desde el paso 4 para todas las demás rayas, ten en cuenta que en algunas líneas, la cinta debe colocarse por debajo del cordón para dejar espacio para la pintura.
7. Una vez aplicada la cinta de pintor en todos lados coloca pedacitos pequeños de cinta en los espacios donde NO va pintura para que no haya confusión.
8. Pinta las rayas, necesitarás al menos 2 capas de pintura.
9. No dejes secar por mucho tiempo la pintura para retirar la cinta ya que si no puede ser que al retirarla se dañe un poco la línea. Si esto pasa, aplica pintura con una brocha pequeña ¡y listo!
Tip: Al pintar las rayas no pongas mucha pintura en los bordes para que luego al jalar la cinta de pintor esta salga más fácilmente.
Aclaratoria: Este post no es pagado, recibí la pintura de Sherwin-Williams para el proyecto. Como siempre todas opiniones, ideas e historias son 100% mías.
2 Comments
Elba Valverde
October 28, 2014 at 3:27 pmStripes look amazing in an accent wall and they don't look heavy. I love the end result, especially the color, perfect for boys and girls. great job!
dcruz
October 29, 2014 at 6:09 amGracias Elba! Yes, that's what I like that they aren't heavy at all 🙂