
Dreamcatchers are great to help kids with nightmares. I made some and I want to show you how to make a dreamcatcher too because it was fun and maybe you’ll need it one day like us. And you also might need to know how to use it, how to make the dreamcatcher catch those nightmares (we had to learn, it wasn’t that easy!).
It all started one day when Adrian came to me saying that he had been having scary dreams and he thought he needed a dreamcatcher. Well, good thing he provided me with the solution to his problem! So I immediately started to find out how to make him one, and it really had to be quick because he did complain every night about scary guys coming in his dreams. I researched and then went out and decided to get colorful twines and decided to make the ring out of sticks, I love the natural look of it.
HOW TO MAKE A DREAMCATCHER
-Scroll down for step-by-step images-
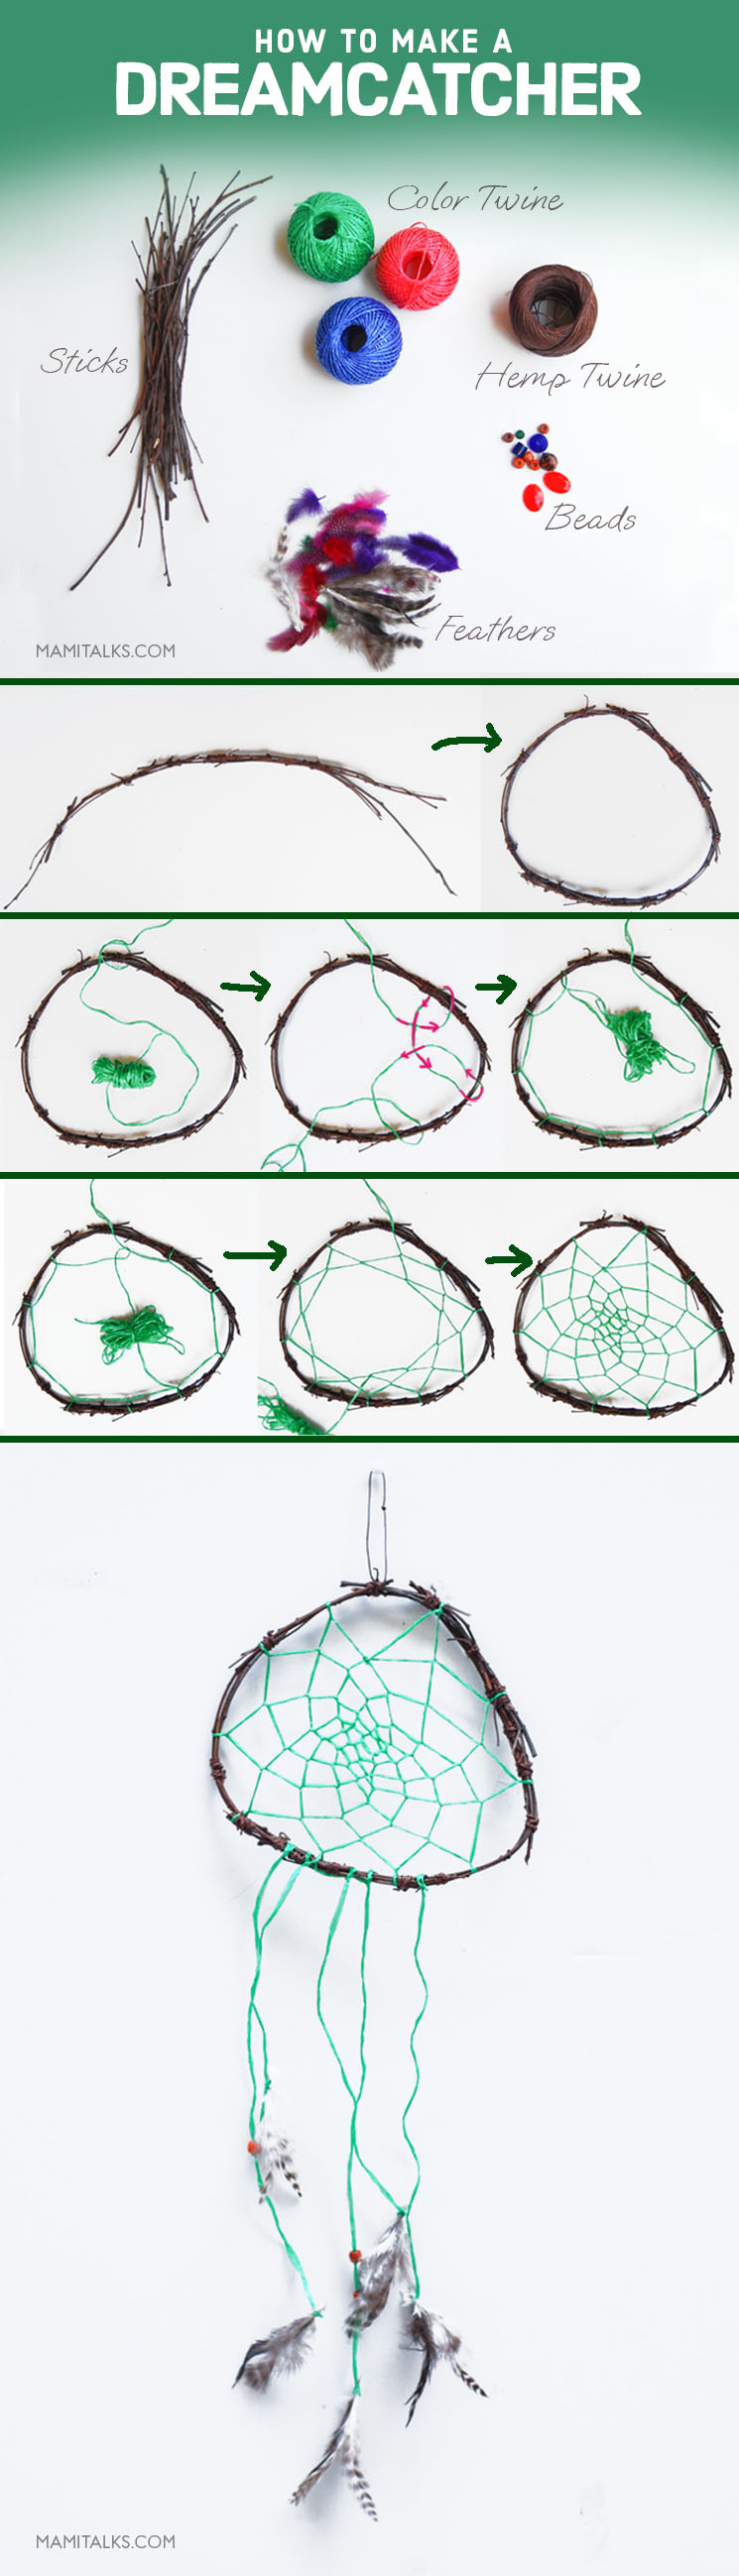
SUPPLIES:
- Color twine
- Sticks (Not too big so you can fold them a little)
- Hemp twine (preferable brown to blend with the sticks)
- Feathers
- Beads
INSTRUCTIONS:
- For the ring. Grab about 3 sticks together and with a little bit of hemp twine tie them looping around the sticks several times in both ends and in the center if necessary.
- Grab 2 or 3 more sticks and tie them together with the first group. Tie the knots wherever you consider necessary. Don’t try to bend the sticks too much at this point.
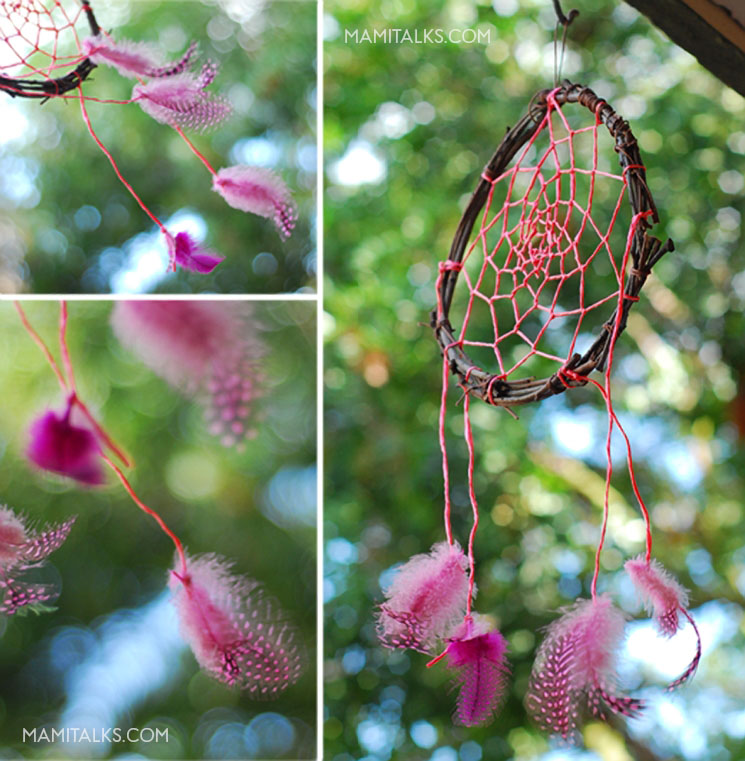
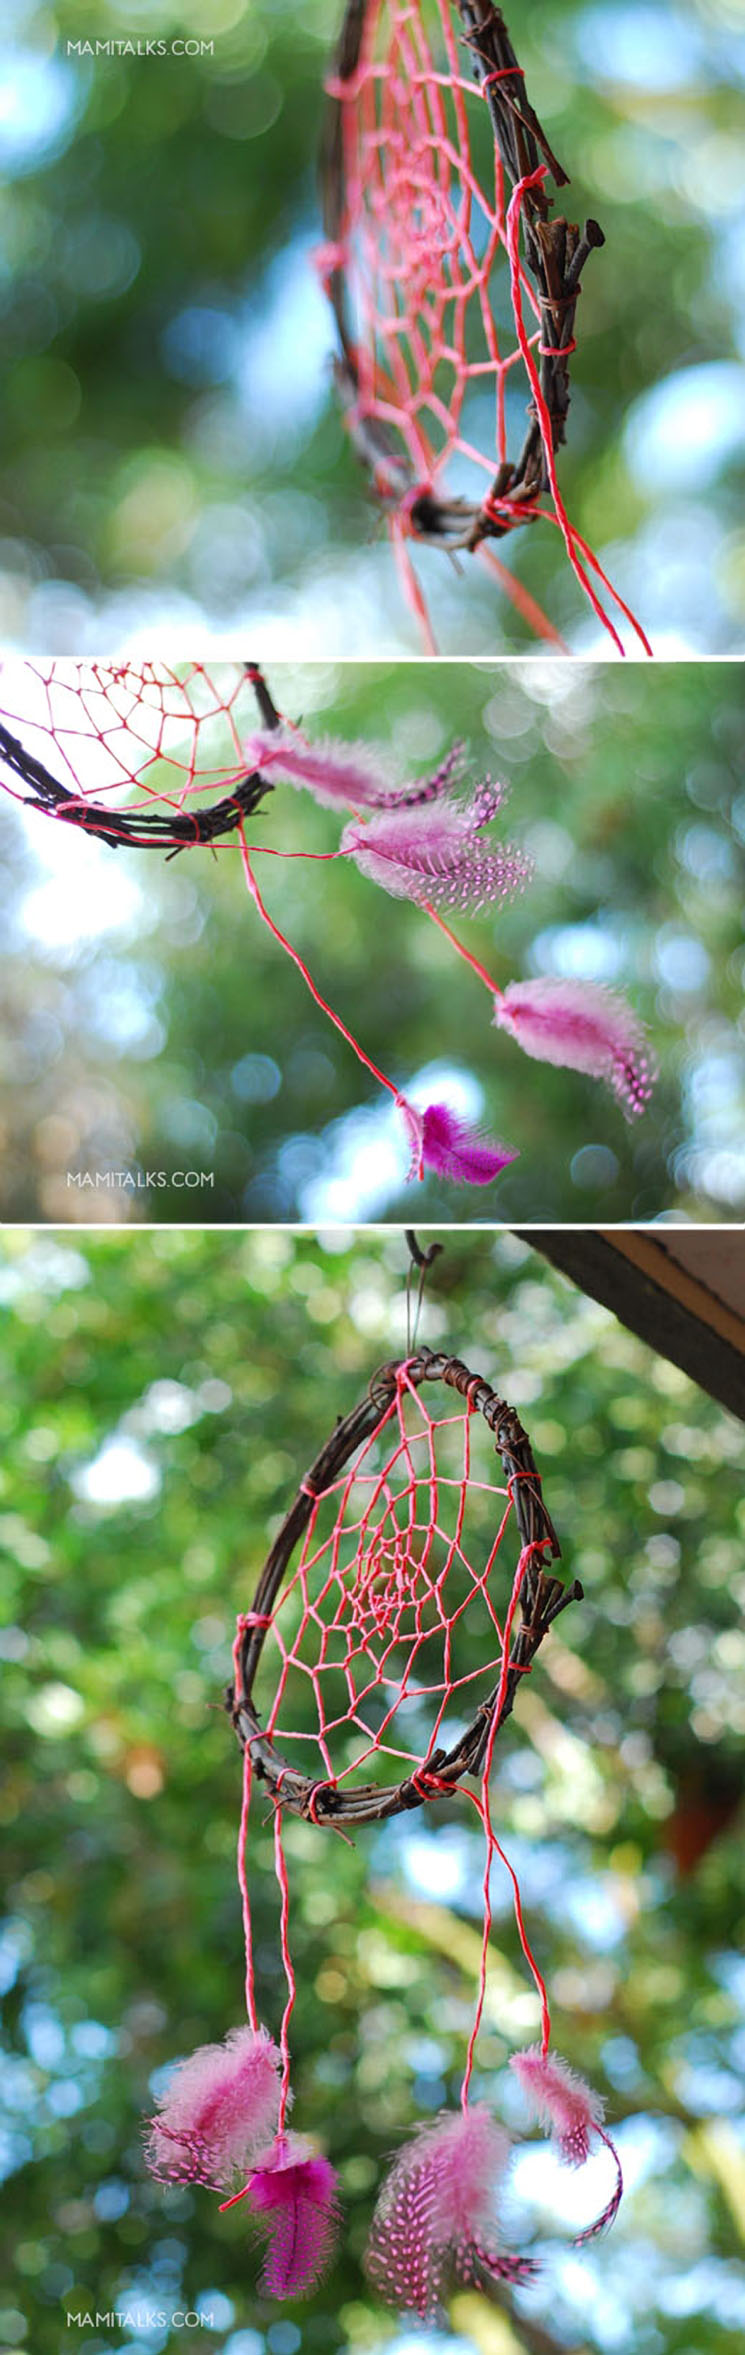
- Continue tying more sticks to the group until you have a long line and you can bend it well enough to make a ring and tie them all back around. The circle we made was about 7-8 inches wide.
- For the web. Cut about 10 feet of the color twine and roll it up in a ball.
- Tie a knot with one end of the twine around the ring of sticks.
- Loop the twine around the ring following the arrows in the graphic below (go first on top of the ring and bring it in from behind it going over the twine again), leave about 1.5″ in between each loop, make them tight.
- When you reach the first loop again start looping in the middle of the first loose area that was left in-between each loop and pull it tight, continue doing this until you reach the center.
- Tie a knot in the middle when you are done weaving the whole ring and cut what’s remaining of the twine.
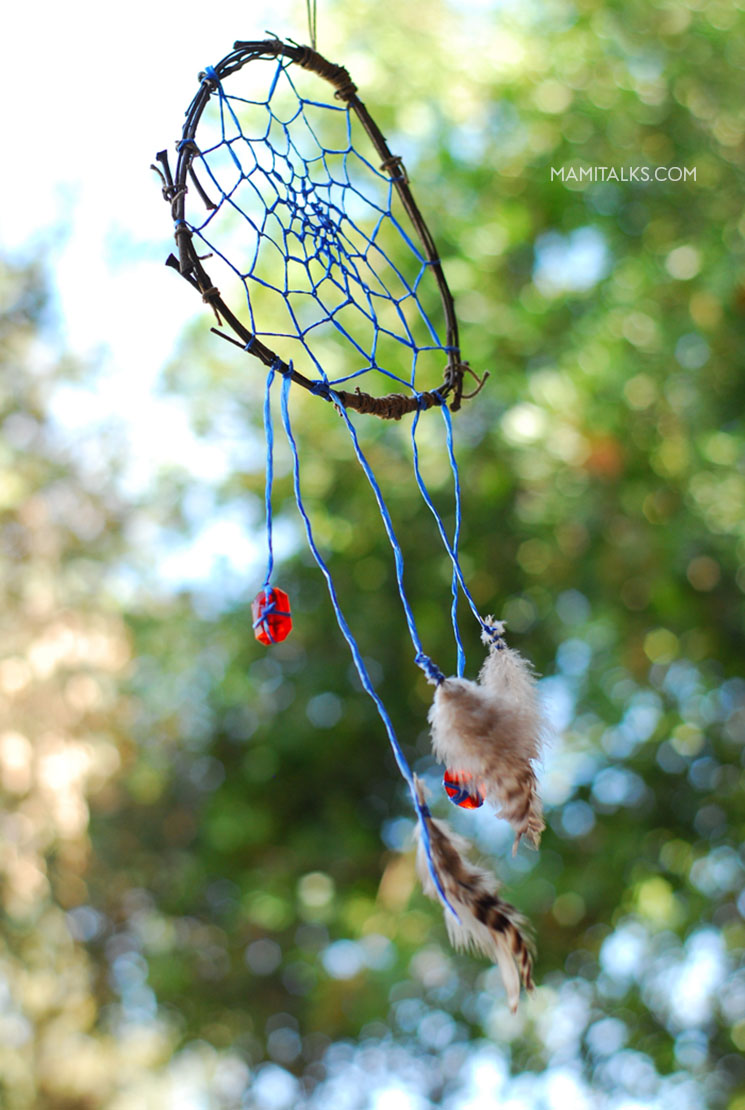
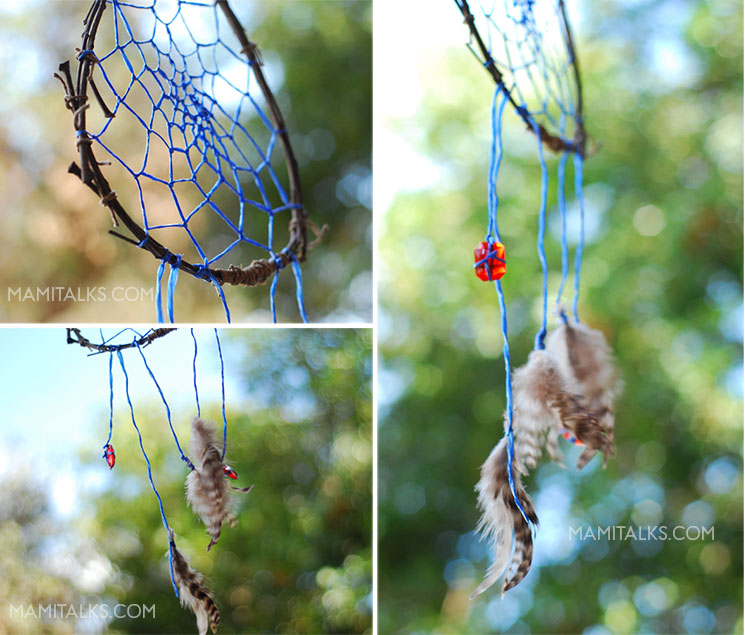
- For the feathers and beads. Grab 2 or more feathers and tie a knot around them with twine. You can hang them on the bottom part of the dreamcatcher any length you want. My suggestion is to play with different lengths and hang at least 3 feathers to it.
- If you want to add beads, make a knot before looping the bead in so it will stay in position and then make another know afterward and add another and so on.
Tip: It can be made with so many different things, you can also add beads looping them in the web while making it and add special details that the person will identify with like long strips of fabrics hanging, felt shapes, etc.
TIPS FOR HOW TO MAKE A DREAMCATCHER CATCH BAD DREAMS
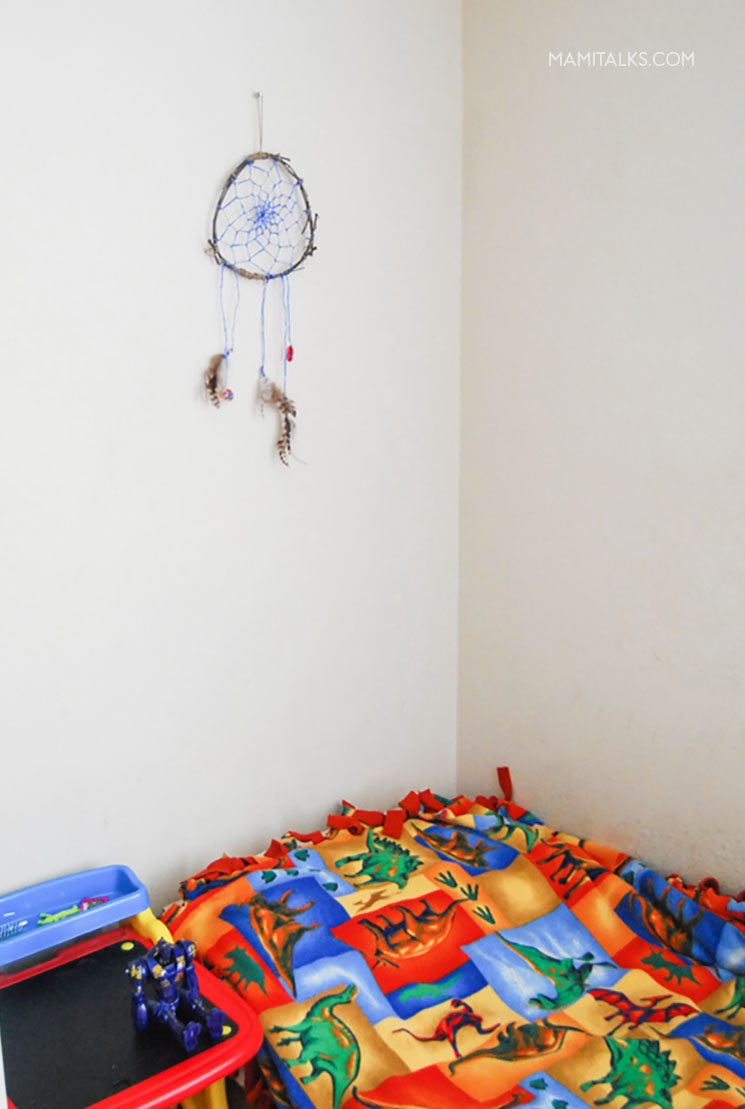
After I made him the dreamcatcher, we hung it on one of the walls by his bed and tried it. He woke up the next morning saying: Mami, the dreamcatcher didn’t work. Oh no! I wasn’t really prepared for it not to work!! So we tried different things for several days until it did finally work, but it took us one full week while those bad dreams kept showing up! So here is how we recommend using a dreamcatcher effectively:
- Hang it over the head of your bed. It will be the closest to your head were your dreams occur. We hung it over the side of it the first time and we believe that wasn’t helping at all.
- Make sure it is clean. If you just made it, it will be clean but as time goes by remember to clean it once in a while.
- Make a prayer every night before going to sleep. I sat with Adrian and talked to the dreamcatcher asking it to help get rid of the bad dreams
- Be specific. We said out loud what things were the “Bad and scary” parts of the dreams so the dreamcatcher would know exactly what to go for.
- Try to think about good and fun things before going to sleep. And lastly, you also have to help a little by thinking good feelings before going to bed, the more you help the dreamcatcher the better!
After all those days, these were the steps we covered and it finally worked! Adrian is happy with his dreamcatcher and hasn’t had huge nightmares anymore. If he comes up again with one I’ll try to clean it and help him think about good things again. Oh and of course I had to make Maya one too, so the pink one in the pictures is hers!
-ESPAÑOL-
TUTORIAL PARA HACER UN ATRAPASUEÑOS Y CÓMO HACER QUE ATRAPE LAS PESADILLAS

COMO HACER UN ATRAPASUEÑOS (DREAMCATCHER)
-La imágen de arriba da el paso a paso visual-
MATERIALES:
- Cordón de color
- Palitos naturales (Que no sean muy grandes para que se doblen un poquito)
- Hilo de cáñamo o encerado (preferiblemente marrón para que se confunda con los palitos)
- Plumas
- Cuentas o bolitas
INSTRUCCIONES:
- Para hacer el aro. Agarra como 3 palitos juntos y con un poquito del hilo amárralos juntos en las puntas y en em medio si es necesario.
- Agarra otros 2 o 3 palitos más y átalos al primer grupo de palitos en al punta. Has mas nuditos donde creas necesario para que se mantengan unidos los palitos No trates de doblarlos mucho toadavía.
- Continúa atando más palitos al grupo hasta que tengas una tira larga y la puedas doblar para que se haga un aro y entonces átalo bien. El aro quCuando termines has un
- Para hacer el tejido. Corta como unos 10 pies del cordón de color y enróllalo en una pelotica.
- Haz un nudo con una punta del cordón en el aro.
- Ahora pasa el cordón por el aro según como indican las flechitas en el gráfico de arriba (por encima del aro, luego sácalo de atrás y vuélvelo a pasar por encima del mismo cordón). deja como unas 1.5″ entre cada vuelta y ponle tensión.
- Cuando ya le hayas dado la vuelta al aro continúa enrollando el cordón de la misma manera pero ahora por el medio del cordón que quedó entre cada vuelta anterior. Continúa haciendo esto hasta que llegues al medio.
- Haz un nudo con el mismo cordón en el miedo bien apretado para que no se salga todo el tejido y corta lo que quede de cordón.
- Para la parte de las plumas y las peloticas. Agarra unas 2 plumas juntas y amárralas con el cordón. Luego amárrala a la parte de abajo del atrapasueños a cualquier altura. Mi sugerencia es que las cuelgues todas a diferentes alturas y al menos 3 cordones con plumas.
- Si quieres añadir peloticas o cuentas haz un nudo antes de meter la cuenta para que se sostenga en su lugar y sigue añadiendo como más te parezca.
Tip: Se puede hacer de muchas maneras, también puedes añadir cuentas mientras que estás tejiendo lo de adentro o añadir tiras de tela colgadas en la parte de abajo o figuras de fieltro… Cualquier cosa que sientas que identifique a la persona que será dueña del atrapasueños.
TIPS PARA USAR UN ATRAPASUEÑOS
Después de que hice el atrapasueños lo colgamos en la pared al lado de su cama y lo probamos una noche. A la mañana siguiente se despertó diciendo: Mami, el atrapasueños no sirvió. Ay no! La verdad no estaba preparada para hacer algo más allá del mismo amuleto, así que probamos con varias cosas por muchos días hasta que al fin funcionó! Pero nos tomó como una semana en que el pobre seguía con sus pesadillas y se levantaba diciéndo que no se habían espantado. Así que aquí les dejo mis recomendaciones para usarlo y que de verdad se vayan esos sueños feos!
- Cuelga el atrapasueños arriba de la cabecera de la cama. Estará ubicado lo más cerca de tu cabeza donde ocurren los sueños. Nosotros lo colgamos en la pared de al lado y como que no servía mucho.
- Asegúrate de que esté limpio. Si apenas lo acabas de hacer sabes que está limpio pero mientras pasa el tiempo acuérdate de limpiarlo de vez en cuando.
- Todas las noches antes de dormir hazle una oración. Yo me senté con Adri y le hablamos al atrapasueños directamente pidiéndole que porfavor se llevara esos sueños malos.
- Se específico. Le dijimos en voz alta cuáles eran específicamente las partes de los sueños que le daba miedo.
- Piensa en cosas bonitas antes de dormir. Por último hay que ayudar al atrapasueños pensando ya desde el principio en algo que nos guste mucho.
Todos estos pasos los intentamos uno por uno durante todos esos días y al final por fin funcionó! Adrian está contento con su atrapapesadillas y no ha tenido sueños feos desde hace tiempo. Si viene alguna pesadilla de nuevo trataré de limpiarlo y ayudarle a pensar en cosas bonitas otra vez. Ah y porsupuesto después le hice uno a Mayita también, el rosado es el de ella!

No Comments